In this section, Dr. Florian Hollerweger discusses challenges students face when engaging in the sound design process and strategies he uses to support them.
Use a Visual to Navigate Stages of the Design Process
For their final project, students engage in the design process as outlined in Andy’s Farnell’s text Designing Sound. In this design process, students don’t write code immediately. Instead, they begin by analyzing, researching, and building models of the real-world sounds they hope to recreate.

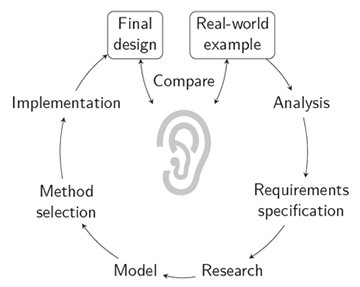
Sound design stages according to Andy Farnell (diagram by Florian Hollerweger).
To help students strategically navigate the design process, I share with them a diagram I created that illustrates the stages of Farnell’s sound design process. We dedicate class time to each one of the stages. It’s very easy for students, especially when they have access to various tools, to hack around and lose sight of the original intent of their projects. I want students to have a firm idea of what they’re going to do before they touch the programming environment, and the diagram helps to remind them of their current stage in the design process and where they are headed next.
Compare your Design to a Reference Recording
To begin with, I ask students to pick a sound or sound environment from their everyday life that they'd like to recreate. Examples of projects in the last few years include popcorn popping in a microwave, a sailboat tacking on the open sea (complete with seagulls), dice being thrown across a wooden table, a quadcopter in flight, and a soccer penalty shootout. After chosing a suitable project, the students' next task is to make a 30-second representative recording of their target sound, to use as a reference throughout the design process.
I developed this strategy in response to my observation during the first year that I taught the course, that students tended to lose track of the big picture over the course of the month-long design process. The representative recording helps students maintain their focus, and it also helps me to better understand the sounds they are aiming for. Students often have a very personal connection to their sound that I don't necessarily share. When they come to office hours and share roadblocks they’re facing with their project, we can easily use the recording to go back to square one and discuss the essential qualities of the sound they’re aiming to recreate. This helps move the work forward.
Support Students Individually through Office Hours
When a student gets stuck, we need to get together to identify the key challenges of their design through an open-ended discussion. You can’t screencast that, and you can’t accomplish this task during a class meeting with 16 students… I often have to extend my office hours to achieve this goal, but it's worth it.
— Florian Hollerweger
A lot of the support I offer students during the design process occurs during office hours. This is because their projects are so individualized. Every student has to come up with their own idea. When a student gets stuck, we need to get together to identify the key challenges of their design through an open-ended discussion. You can’t screencast that, and you can’t accomplish this task during a class meeting with 16 students. This is a challenge for both, me and my students, because we need to find adequate time for me to support them individually as they move through the design process. I often have to extend my office hours to achieve this goal, but it's worth it. It's in the direct interaction with students that I get to share their eureka moments.
Reference
 Farnell, Andy. Designing Sound. MIT Press, 2010. ISBN: 9780262014410. (Book and accompanying Pd example files.)
